Manage work plan assignments
Voraussetzungen
- Genesys Cloud CX 3, Genesys Cloud CX 4, Genesys Cloud CX 1 WEM Add-on II, Genesys Cloud CX 2 WEM Add-on I oder Genesys Cloud EX-Lizenz
- Workforce Management > Work Plan > View permissions
- Workforce Management > Business Unit > View permissions
- Workforce Management > Management Unit > View permissions
- Workforce Management > Agent > View permissions
- Groups > Work Team > View permissions
You can perform the following actions from the Work Plan Assignments page. Click each option to read about the actions you can perform on this page.
To view the agent work plan assignment details, perform the following steps:
- Klicken Sie auf Admin.
- Under Workforce Management, click Work Plan Assignments.
- From the Business Unit/Management Unit list in the upper right corner, select the business unit/management unit. The Work Plan Assignments page is displayed.
You can view the list of agents available under the management unit along with details such as, effective work plan, work team, and override details. 
Note: Only work plan assignment overrides and temporary changes are available on this view. You can view the default work plan and work plan rotation assignments under the user/agent tab of the respective pages.
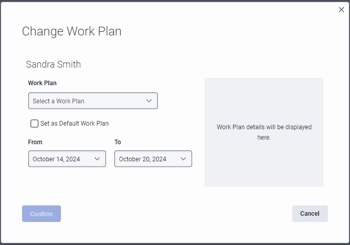
To change the work plan of an agent, perform the following steps:
- Navigate to the Work Plan Assignments page.
- To select the agent whose work plan requires changes, click the checkbox next to the agent. You can select multiple agents if they all need to be assigned to the same work plan.
- ClickChange Work Plan. The Change Work Plan dialog box is displayed.

- In the Work Plan field, select the new work plan.
- Select the required options in the fields displayed.
- To change the work plan of a single agent, perform these steps:
- Check the Set as Default Work Plan checkbox if you want to make the selected work plan as the default work plan. A new work plan assignment with an open-end date is created.
- In the From field, select whether to start the work plan immediately or from a particular day. Note: This field is displayed only when you check the Set as Default Work Plan checkbox.
- To create a temporary work plan change for a single agent, perform these steps:
- In the From field, select the date to indicate the start date of the work plan.
- In the To field, select the date to indicate the end date of the work plan.
- To change the work plan of multiple agents, perform these steps:
- In the From field, select whether to start the work plan immediately or from a particular day.
- To change the work plan of a single agent, perform these steps:
- The section on the right displays the work plan for the entire week for the period ahead.
- Click Confirm to confirm the changes. The updated work plan is displayed on the Work Plan Assignments page.
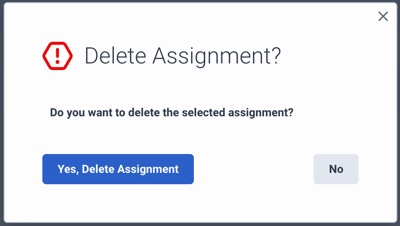
To delete a work plan, perform the following steps:
- Navigate to the Work Plan Assignments page.
- Click the agent whose work plan you want to delete.
- In the Agent Work Plan Assignments page, select the work plan.
- Click Delete. The Delete Assignment dialog box is displayed.
- Click Yes, Delete Assignment to confirm deletion.